Installation of 002 MT Custom Look - Step by Step (without a Design Package)
Installation of 002 MT Custom Look without a Design Package is OPTIONAL
It is highly recommended to store core theme files (CSS and images) directly on your SharePoint server (15 Hive). This installation method will save you a great amount of time. If you do so, you will not be required to add theme files (CSS and images) to newly created sites in the event that you are not going to use (import) the design package.
Also:
- Installation of Core Theme files (CSS and images) directly on your SharePoint server (15 Hive)
- Installation of Core Theme files (CSS and images) with no access to the server (15 Hive)
- Installation of Master Pages
- Adding Predefined Color Palettes (*.spcolor files) to Theme Gallery
- Creating a Composed Look
- Changing the Look
This document applies to the following site types:
Publishing Portal, Enterprise Wiki, Product Catalog, Team Site, Blog, Developer Site, Project Site, Community Site, Document Center, Records Center, Business Intelligence Center, Enterprise Search Center, and Visio Project Repository.
Installation Order
Skip STEP A. in this document, and jump to STEP B. if you do not have an access the server (15 Hive).
- Install SharePoint Designer 2013
(to download SharePoint Designer 2013 visit the Official Microsoft® Download Center at http://www.microsoft.com/en-us/download/details.aspx?id=35491). - Extract YourPackage.zip file.
- Expand the Core_CSS_Files\GLOBAL folder and copy the 002_MT-CSS.CSS style sheet to your clipboard.
- On your server, navigate to Your SharePoint Local Disc:\Program Files\Common Files\Microsoft Shared\Web Server Extensions\15\TEMPLATE\LAYOUTS\1033\STYLES\Themable directory.
- Paste the 002_MT-CSS.CSS style sheet into ...1033\STYLES\Themable directory.
- Go back to the extracted YourPackage.zip folder, navigate to the Theme Core_CSS_Files\GLOBAL folder and copy the entire 002_MT-Images folder to your clipboard.
- Navigate to Your SharePoint Local Disc:\Program Files\Common Files\Microsoft Shared\Web Server Extensions\15\TEMPLATE\IMAGES directory.
- Paste the entire 002_MT-Images folder into ...TEMPLATE\IMAGES directory.
Skip STEP B. in this document and jump to STEP C. if you have an access to SharePoint server, and you were able to store Core Theme files (CSS and images) in 15 Hive (STEP A.).
- Install SharePoint Designer 2013
(to download SharePoint Designer 2013 visit the Official Microsoft® Download Center at http://www.microsoft.com/en-us/download/details.aspx?id=35491). - Extract YourPackage.zip file.
- Expand the Core_CSS_Files/VIRTUAL folder, and copy the entire Themable folder to your clipboard.
- Open your site http://YourSharePointSite in SharePoint Designer, click All Files (left pane), and expand Style Library folder (right pane).
- Click on the white space in the Style Library folder so it becomes active.
- Paste the entire Themable folder from your clipboard into Style Library folder.
- Open http://YourSharePointSite (your top-level site) in your browser.
- Go to Site Settings -> Click Master pages and page layouts (under Web Designer Galleries).
- Click Files tab in the Ribbon Area -> Upload Document.
If you have an access to 15 Hive:
Go to your extracted YourPackage.zip folder, navigate to the Master_Pages\GLOBAL\Core15 folder -> Upload the following files: 002_MT-Master-GLB.master, 002_MT-Master-GLB.preview, 002_MT-Footer-GLB.master, and 002_MT-Footer-GLB.preview.
If you do not have an access to 15 Hive:
Go to your extracted YourPackage.zip folder, navigate to the Master_Pages\VIRTUAL\Core15 folder -> Upload the following files: 002_MT-Master-VRT.master, 002_MT-Master-VRT.preview, 002_MT-Footer-VRT.master, 002_MT-Footer-VRT.preview.
For Office 365:
Go to your extracted YourPackage.zip folder, navigate to the Master_Pages\OFFICE-365\Core15 folder -> Upload the following files: 002_MT-Master-O365.master, 002_MT-Master-O365.preview, 002_MT-Footer-O365.master, 002_MT-Footer-O365.preview.
* 002_MT-Footer.master is a master page that comes with a custom footer which is OPTIONAL for use.
- Edit Properties for 002_MT-Master.master, 002_MT-Master.preview, 002_MT-Footer.master, and 002_MT-Footer.preview (right-click the files).
- Specify the following settings for master pages *.master:
Content Type: Master Page, or Html Master Page
Name: 002_MT-Master for 002_MT-Master.master (-GLB.master, -VRT.master, or -O365.master), and 002_MT-Footer for 002_MT-Footer.master (-GLB.master, -VRT.master, or -O365.master)
Title: leave it blank
Description: leave it blank
Compatible UI Version(s): 15
Contact: Leave it blank
Preview Image: Leave it blank
Hidden Page: Unchecked
Default CSS File: Leave it blank
Associated File: Unchecked
Preview URL: Leave it blank- OR - (for site collections with disabled publishing features)
Content Type: Master Page, or Html Master Page
Name: 002_MT-Master for 002_MT-Master.master (-GLB.master, -VRT.master, or -O365.master), and 002_MT-Footer for 002_MT-Footer.master (-GLB.master, -VRT.master, or -O365.master)
Title: leave it blank
Description: leave it blank
UI Version: 15
Default CSS File: Leave it blank
- Specify the following settings for preview files *.preview:
Content Type: Master Page Preview
Name: 002_MT-Master for 002_MT-Master.preview (-GLB.preview, -VRT.preview, or -O365.preview), and 002_MT-Footer for 002_MT-Footer.preview (-GLB.preview, -VRT.preview, or -O365.preview)
Title: leave it blank
UI Version: 15 - *IMPORTANT:
If your http://YourSharePointSite is a publishing site, you must publish your newly added/edited master pages, and preview files.
Right-click each of the uploaded files -> Publish Major version -> Click Ok.

- Open your site http://YourSharePointSite in SharePoint Designer -> click All Files (left pane), and expand _catalogs/theme/15 folder (right pane).
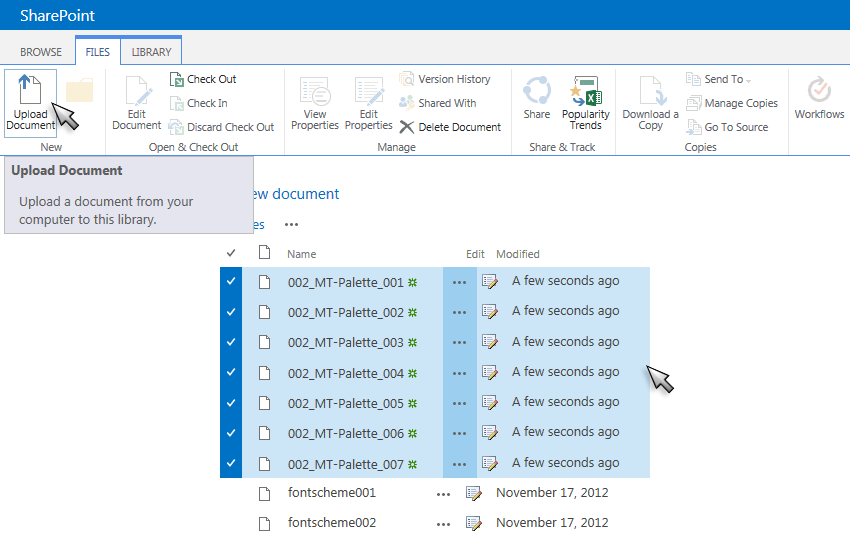
- Go to the extracted YourPackage.zip file, expand Theme Gallery folder, and copy *.spcolor files to your clipboard.
- In SharePoint Designer, click on the white space in _catalogs/theme/15 folder so it becomes active.
- Paste the file(s) from your clipboard into _catalogs/theme/15 folder.
- OR - (if you prefer to use your browser instead of SharePoint Designer)
- From your browser open http://YourSharePointSite -> go to Site Settings -> Theme (under Web Designer Galleries).
- Expand 15 folder, and upload *.spcolor files from your extracted YourPackage.zip file.
* Platinum Package comes with 7 predefined color palettes *.spcolor files:
- Open http://YourSharePointSite in your browser.
- Go to Site Settings -> Click Composed Looks (under Web Designer Galleries).
- Click + new item, and enter the following for a new Composed Look:
Title: 002 MT
Name: 002 MT
Master Page URL: /_catalogs/masterpage/002_MT-Master.master (-GLB.master, -VRT.master, or -O365.master)
Type the description: /_catalogs/masterpage/002_MT-Master.master (-GLB.master, -VRT.master, or -O365.master)
Theme URL: /_catalogs/theme/15/002_MT-Palette_001.spcolor
Type the description: /_catalogs/theme/15/002_MT-Palette_001.spcolor
Image URL: leave it blank
Type the description: Leave it blank
Font Scheme URL: leave it blank
Type the description: Leave it blank
Display Order: 1
*Important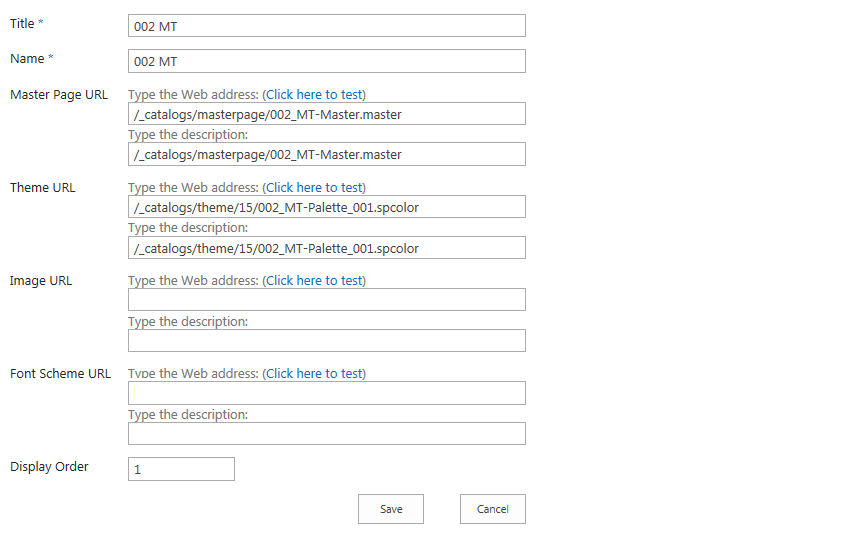
If your site's URL is created under "/sites" (e.g. http://YourSharePointSite/sites/YourSharePointSite/...), you need to add /sites/YourSharePointSite to the front of /_catalogs/masterpage/...Title: 002 MT
Name: 002 MT
Master Page URL: /sites/YourSharePointSite/_catalogs/masterpage/002_MT-Master.master (-GLB.master, -VRT.master, or -O365.master)
Type the description: /sites/YourSharePointSite/_catalogs/masterpage/002_MT-Master.master (-GLB.master, -VRT.master, or -O365.master)
Theme URL: /sites/YourSharePointSite/_catalogs/theme/15/002_MT-Palette_001.spcolor
Type the description: /sites/YourSharePointSite/_catalogs/theme/15/002_MT-Palette_001.spcolor
Image URL: leave it blank
Type the description: Leave it blank
Font Scheme URL: leave it blank
Type the description: Leave it blank
Display Order: 1
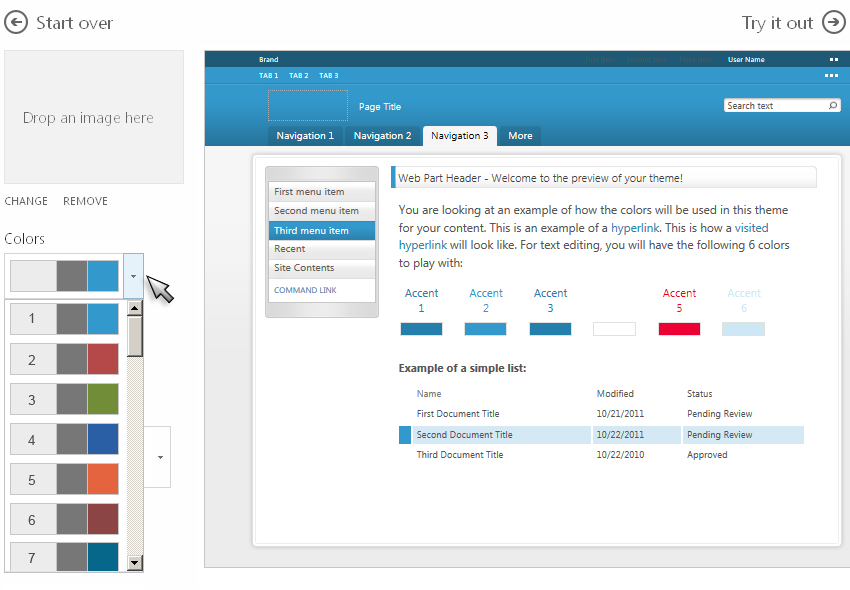
- Click Change the look (on the Settings menu, or on the Site Setting page under Look and Feel).
- OR -
Click Site Settings -> then, in your browser's address bar delete everything after .../_layouts/15/, and type DesignGallery.aspx after .../_layouts/15/ -> press Enter.
URL samples:
http://YourSharePointSite/_layouts/15/DesignGallery.aspx
http://YourSharePointSite/sites/YourSharePointSite/_layouts/15/DesignGallery.aspx
This will open Change the Look page: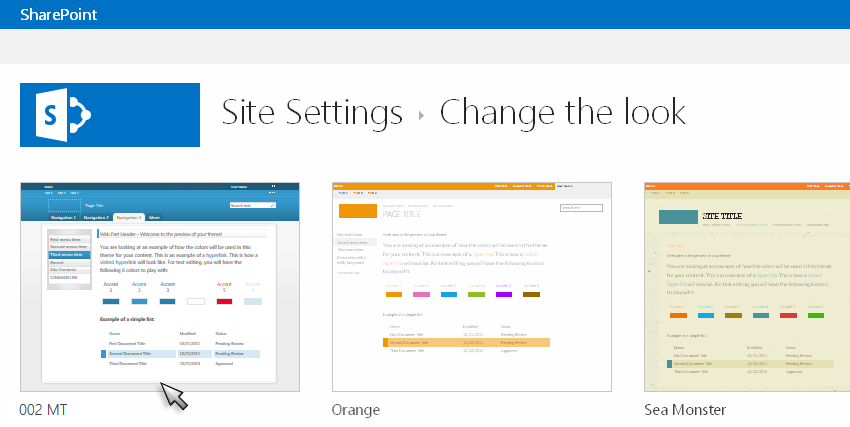
- Click the thumbnail 002 MT.
- From the Colors list, select one from the top 7 color palettes (listed as first 7 from the top). *IMPORTANT:
- For Site layout (Master Page) select 002_MT-Master-(GLB/VRT/O365).master, or 002_MT-Footer-(GLB/VRT/O365).master (*for Community Portal - leave unchanged).
- Fonts - leave unchanged.
- Click Try it Out -> Click Yes, keep it.
(*If some icons did not change color, reapply the 002 MT look.)
Only the top 7 color palettes from the list are designed for the 002 MT look (multiple color palettes are enclosed in the Platinum Package only). Out-of-the-box color palettes may not work properly with the 002 MT look.